Leap of Faith and the Magic of Worms

Potting mix

Posted by Kelley...


About every January, as we plan for our seedlings, we review some lessons learned from our past years and make adjustments to improve our little venture.  Of course, our #1 concern is raising healthy plants, and as such I get obsessed with improving our potting mix.  After all, it all starts there.

This year, I focused on dialing in nutrients and incorporated dairy vermicompost into our mix.  After reading studies done at Cornell University and OSU about dairy vermicompost I was eager to try it.  It’s not cheap…REALLY not cheap, but after agonizing over the cost, we decided to take the leap of faith.   

Vermicompost?  Dairy Vermicompost? What’s that, and why is it so special?

No, it’s not pure worm castings. Our dairy vermicompost came from Sonoma Valley Worm Farm. It started out as manure from an organic dairy.  That manure was hot composted for a few weeks to kill weed seeds and pathogens, then introduced to the worms. The worms processed the material for an extended time, and then it was harvested.  It’s beautiful stuff.  It’s friable and earthy, has some structure, some nutrients, and is loaded with diverse microbes.  Those microbes are the basis for a healthy environment, and some of those microbes make nitrogen and other nutrients available to plant roots.

In addition to the vermicompost, we’re also using worm tea regularly as a foliar feed. So far I’m totally impressed.  We have not had to resort to any artificial feeding methods so far, and that has us happy and hopeful.  Greenhouse and container culture is a tough one to do completely organically.  There’s temperature and moisture fluctuations, drainage issues, and the many challenges of keeping the mix in a 4” pot healthy and balanced.  We try our best every year, and while we avoid using chemicals for pests and diseases, we have always had to resort to feeding the plants non-organic nutrients after they’ve been in their pots awhile.  Thanks to the magic of worms, this year it looks like we’ll get our plants to market on the natural plan.  We’re SO hopeful and excited!

You Can Try it Too.

We’ve put together a nutrient mix that includes a healthy dose of vermicompost and bagged it.  It’s suitable for both in-ground planting and containers.  Good stuff!  We’ll have it on hand for our customers at the Expo, the farmer’s market, and our curbside sales.  

Planting Basics

I am going to cheat and re-publish parts of posts from 2010, partly because they are basic, and partly because I think I did an amazing job being succinct (a personal best).
-----------------------------------
Here are 3 basic things to help grow a successful crop of tomatoes.

1. Plant deep - As we all know, root development is key to the life of almost all plants.  And all those hairs on the stem of the tomato plant are actually potential roots, ready to develop and suck up nutrients. So, to take advantage of the tomato's root-iful characteristics, lower at least 50% of the green part our plants into its planting hole.  The hole, by the way, should be approximately the size of a half-wine barrel: 18 inches deep, 2 feet in diameter.

Be sure to fill that hole with good stuff.  Tomatoes like well-drained soil -- they will suffocate in our lovely Contra Costa clay.  To get that result the easy way, fill the hole with a good, balanced mix like Navlet's Planting Mix.  Then, give the hole with the plant in it a great, big initial drink.  Fill the hole basically to overflowing so that the entire root ball and contents of the hole are wetted.

We also recommend the following for the initial planting.  These additions should be mixed evenly into the hole, except for the fish head:

1 fish head at the bottom of the hole for nitrogen, phosphorus and calcium, and for a big boost to the wonderful soil life that digest the fish head and make nutrients available to the plants.  I got mine at Ranch 99 for $.79/lb, but any fish monger or Asian-style market is likely to have them.  If the heads are big, like salmon, it's perfectly OK to cut them in half;
3-4 crushed eggshells, for calcium, that I saved over the winter;
1 handful of bone meal which is rich in phosphorus and critical to fruit production;
1 modest handful of worm castings for a delicious first feed;
the recommended dose of mycorrhizae from Bountiful Gardens, where you can read about the amazing things this product does.

I know this may seem excessive, but given the resources that you are going to give the plant in terms of time and water, do yourself a favor and make sure to give the plants the best start.

2. Feed well - tomatoes need to be fed about once a month after planting. There are many and complicated recipes. However, a balanced organic fertilizer that emphasizes phosphorus is a good choice, e.g., a 4-6-4. Phosphorus, the second number in all fertilizer forumulas, is key for fruit production. Many good organic fertilizers can be purchased at your local nursery. We got our plants off to their great start with combinations of products from Dr. Earth, Whitney Farms (currently, a Scotts company), and E.B. Stone.

3. I'll have another sip - be consistent in watering tomatoes after planting to avoid "bingeing". It's not good to drown them one day and follow up with a week of neglect. You can easily monitor the plants' needs by sticking your finger down a couple of inches into the soil. If it's dry, they may need a drink, but maybe not: tomatoes like a bit of drying, even to the point of mild wilting. Mulch also helps -- it slows down moisture loss and keeps roots cooler by providing shade for the soil. Put the mulch up to about 6 inches from the stem; that way, certain pests won't be able to stage a sneak attack under the cover of the mulch.

One last thing: rotate your tomato sites year over year for disease control. Many of the most common tomato pests live in the soil, but you can usually outrun 'em by planting in different locations.

----- Arti

Container Planting

We get a lot of inquiries about growing tomatoes in containers. While neither of us are experts, we are opinionated, so I get to give you my 2 cents.  If you're a seasoned container gardener with a solid history of success, then I probably need your opinions more than you need mine.  If you have spotty success or are new at this, I hope this helps.

The Container:  Most tomato varieties want a large container.  15 gallons minimum.  A tall pot is better than a short wide one.  Don't skimp on the size of container, those roots need room!  There must be a hole in the bottom for water drainage.  I don't like those saucers that catch water under the pot.  What's the point of a drainage hole if the pot is going to sit in a pool of water?  Also remember that pots, especially dark plastic ones, can absorb a lot of heat.  That's a plus in the spring when temperatures are cooler, but bad when it gets hot and the sun is intense.  Draping shadecloth around the container will help.  Thick terracotta pots don't seem to have this problem.

The "Soil":  Container growing is not like growing in the ground. Do not use garden soil, topsoil, or that pile of dirt in the corner of your yard. The pot serves up some challenges, and using soil makes those problems worse.  Don't use pure compost either.  Use potting mix.  A good one.  Why?  I could write a whole missive about this and tell you greenhouse horror stories involving 1000 tomato seedlings, but that's for another time. So, what's a "good" mix?  Good mixes have structure, hold a lot of air and some water, but drain really well.  Typical mixes in our area contain partially composted fir bark or bark fines (sometimes rice hulls), peat moss or coir, perlite, and some nutrients and ph adjusters.  It's hard to recommend a brand, because I've had great results some years and bad ones the next with the same brand. Cynthia Sandberg, who farms for Michelin rated Manresa restaurant, swears by Gardner & Bloom potting soil.  That's the best I can do for a brand recommendation.  If you open a bag of potting mix and most of the contents are very fine (less than 1/16"), you don't have a good mix.  It won't have enough structure, won't drain well, won't hold air, and will "collapse" or compact in short order.  All bad news.

Planting:  Tomato plants benefit from planting deeply.  Very deeply.  You want to bury much of the stem,  I'd say halfway up the stem is good general rule.  Clip off all the leaves below that halfway point just before you plant.  The part of the stem that's buried will grow roots, which will produce a healthy productive plant.  Before you place the plant down into the container, gently pull the rootball out at the sides, so it loses the seedling container shape and encourages the roots to grow outward.  Once planted, water thoroughly.  You want the potting mix and the rootball to get evenly moist.  Just because water drains out the bottom doesn't mean everything is evenly moist.  Water once, come back in 5 or 10 minutes and water again, then wait another few minutes and water a third time.

Nutrients:  If you're using an organic potting mix, or one that does not contain a CRF (control release fertilizer), your greedy, hungry tomato plant will use up all the available nutrients in 4-6 weeks.  I like to mix an organic dry vegetable food (such as Dr. Earth, Whitney Farms, Espoma, etc) into the upper 2 - 4" of potting mix at planting time with a little extra bat guano or alfalfa meal, used sparingly. Still, at 4-6 weeks, you'll need to start feeding again. Then I'd switch to an organic liquid food, and feed weakly weekly--a weak solution once a week, like 1/2 the strength suggested on the label.

Watering:  Don't kill 'em with kindness.  Tomato plants don't like to be wet all the time.  They prefer to go just a little on the dry side (slightly moist), and then be watered well.  Frequency will change over the season.  Hot or cool temperatures, longer days, wind, sun exposure, your potting mix and the size of the plant all influence frequency.  You may only need to water once a week in spring, and then once a day in summer when it's hot and the plant is larger.  You'll need to get a feel for that.  Don't be shy about sticking a finger down into the soil.  Just because the top looks dry doesn't mean it's dry 6 or 8 inches down.

Staking:  Most varieties need to be staked or caged, even in a pot. Unless you're growing a determinate variety or a specifically compact variety, don't bother with those crappy little wire cages. They are a waste of money and resources. One day you'll come out for a visit with your tomato friend and it will have pulled that thing out of the soil and be wearing it like a hat. Then it will fall over. You'll then have to figure out how to extract the plant from the cage without destroying both. Does it sound like I've been there before? Go to your local home improvement store and find the aisle with sacks of concrete. You'll see remesh mats--4' x 7' welded wire mesh sheets made for reinforcing concrete. Buy one. Roll it into a tube shape and wire it together so it will stay in the tube shape. Now you have a functioning tomato cage. Slip it over the plant, tuck it's arms and legs inside and secure the cage to the container with a long stake driven into the soil and wired to the cage. If you don't stake the cage down your tomato friend will one day yank it out and try to heave it across the yard. Continue to tuck it's arms and legs inside the cage as it grows.

A Note about Varieties:  I think people assume that they must grow cherry varieties if growing in containers, but it's not the size of the fruit that matters as much as the growth habit of the plant. We offer a couple of cherry varieties that I swear would knock a 15 gallon container over, drag it around the yard and then become very unhappy. That said, I don't recommend most of the big, late season beefsteak varieties because the chances of getting only 2 or 3 tomatoes all season are just too high. If you're growing more than a couple of plants, the risk may be worth it. Many of the early and mid season varieties, and those that are prolific producers will do well for most people.

A Note on Drainage:  Here's the part where I feed you more information than you wanted. One major problem with container growing is drainage. Even with a good potting mix you are likely to get water that just won't drain out of the pot, and it pools in the bottom making a soupy, airless layer that roots don't like. This is "perched" water. We all used to think that putting gravel or sand or pot shards in the bottom of our pots would eliminate perched water, but it turns out that physics doesn't work that way. I won't bore you with the details here (I'll bore you with it in another post), but gravel in the bottom of a pot only takes up space, and the perched water will still stick in the bottom layer of potting mix above the gravel. Now, sometimes plant roots will colonize that zone before it gets bad and use that water, but many times not. So what's the solution? Before you fill your container with soil, take a mop string, or absorbent length of rope and coil it around the bottom of the inside of the pot, then thread one end through the drainage hole and let it dangle a couple of inches below the bottom. Elevate the pot with pot feet or something that will keep the pot from sitting on the ground.  Now fill your container with potting mix. The mop string/rope acts as a wick, drawing excess moisture down the string and out of the pot. It's the same idea as sticking the corner of a paper towel in a cup of water and watching the water get pulled into the paper towel. Are you asleep yet?

Wow, that was more like 10 cents worth of opinion. How about you? What works for you? Please share!

...Kelley

Planting Q&A with Kelley and Arti

While you all have been busy gardening since our last posting, we've been away catching up on our separate interests. That included a tour of Eastern Sierra/Great Basin native plants (e.g., native claret cup cactus at right).

However, despite the vacations, Kelley still managed to amend her good ol' Contra Costa clay just in time for planting by June 1. It was sort of an homage to that classic "Faster, Kelley! Dig! Dig!". Arti "interviewed" her and she has this advice to share:

Arti's Question: You have a backyard that had grass and other stuff growing on it at one time -- why did you amend the soil before planting?
Kelley's Answer: There are 2 main reasons I had to amend my soil.

First, the grass that was once there is long gone, especially since we ran over it repeatedly with heavy equipment when we remodeled the house. That said, the type of suburban grass that was most likely there has shallow roots. Therefore, it never needed to reach deep into the native clay. The tomatoes and other plants I've put in have deeper roots.

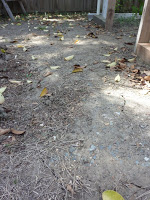
The clay is basically impenetrable -- heavy, gluey glop in winter, and brick-hard in summer. Remember what all those Spanish missions were made of? So, my soil had to be loosened up and material added to keep it from returning to its original dense, airless state. This picture sums it up: look at the flat, packed and cracked character of the unamended part of my yard.

Second, a simple soil-testing kits from the hardware store revealed that the soil was an empty plate. Now, there may have been some nutrients in it, but they were "locked up". This means that nutrients may be present, but the plant does not have the chemical or mechanical processes to use it. For example, this winter we had a good amount of rain, which contains lots of nitrogen that plants love.

However, that nitrogen is in an organic form that plants cannot use. Bacteria found in soils convert organic forms of nitrogen to inorganic forms that the plant can use. Nitrogen is taken up by plant roots and combined into organic substances in the plant, such as enzymes, proteins and chlorophyll. Thus, regardless of whether there might have been any nutrients in the soil, it was essentially an empty plate for the plants.

To fix this problem, I double dug several planting beds and added the following for every square yard of clay that was dug up:

- 70% Compost, for general enrichment, aeration
- 10% Bone meal, as a phosphorus boost for fruit production
- 10% Kelp meal, for potassium and trace minerals
- 10% Worm castings, for enrichment

Q: After amending the soil, did you just plop the plants in?
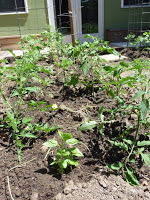
A: Tomatoes being the heavy feeders they are, I added more goodies to the holes in each new fluffy bed (see right) to increase the possibilities for a succesful crop. To each 12" deep hole I added:

- 1 fishead for a calcium boost, which guards against blossom end rot. I got mine at Ranch 99 for $.79/lb, but any Asian-style market is likely to have them;
- 3-4 crushed eggshells, also for calcium, that I saved over the winter;
- 1 handful of bone meal (from Navlet's) which is rich in phosphorus and critical to fruit production;
- 1 modest handful of worm castings, also from Navlet's, for a delicious first feed;
- the recommended dose of mycorrhizae from Bountiful Gardens, where you can read about the amazing things this product does.

Then, after the plant was lowered into the hole and the soil carefully, gently backfilled, I topped it off with nice drink of Dr. Earth's 5-7-4 plant food.

Q: Any other interesting things you found out in the process?
A: Yes, WAY!

Remember how we always say to rotate tomato crops? Well, when I dug up last year's bed, I found several fat, gross hornworm pupae, just waiting to emerge into their adult stage as a hawk/hummingbird moth. Sure am glad I did not use that bed again!

I also discovered that my yard is not all the same clay, nor even all clay. I found brown, red, green, and black clay...not sure what it means, but food for thought. Then, in a thin band around the inside of my fence, I found nice soil with perlite in it and all. This was obviously the remnant of what were perimeter plantings when this was a traditional suburban lawn.


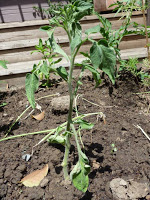
Finally, I noticed that one of our tomato varieties, the White, likes to pretend it has leaf curl -- see this picture at right. So, if you are one of our customers who bought this variety, do not panic.

The Big 3..or 4

There are lots of tips and tricks, but here are 3 basic things to help grow a successful crop of tomatoes.

1. Dirt wrap - you know how some spas offer to surround you up to your chin in warm, clean, mud? Well, that's exactly how tomatoes like to be planted. I personally believe that is why they have such cute, hairy stems. Those hairs are actually potential roots, ready to develop and suck up nutrients.
Just trim off the lower leaves, nestle the plant in up to its leafy chin and give it a great, big initial drink for its summer heat treatment.

2. Feed me - tomatoes need to be fed about once a month after planting. There are many and complicated recipes. However, a balanced organic fertilizer that emphasizes phosphorus is a good choice, e.g., a 4-6-4. Phosphorus, the second number in all fertilizer forumulas, is key for fruit production. Many good organic fertilizers can be purchased at your local nursery. We got our plants off to their great start with combinations of products from Dr. Earth, Whitney Farms (currently, a Scotts company), and E.B. Stone.

3. I'll have another sip - be consistent in watering tomatoes after planting to avoid "bingeing". It's not good to drown them one day and follow up with a week of neglect. You can easily monitor the plants' needs by sticking your finger down a couple of inches into the soil. If it's dry, they may need a drink, but maybe not: tomatoes like a bit of drying, even to the point of mild wilting. Mulch also helps -- it slows down moisture loss and keeps roots cooler by providing shade for the soil. Put the mulch up to about 6 inches from the stem; that way, certain pests won't be able to stage a sneak attack under the cover of the mulch.

One last thing: rotate your tomato sites year over year for disease control. Many of the most common tomato pests live in the soil, but you can usually outrun 'em by planting in different locations.